Book In a Result Set - With Checks
N.B. To complete this procedure you must have a completed room form, and the matching plates.
-
From the Book In Form click the New Book In button.

-
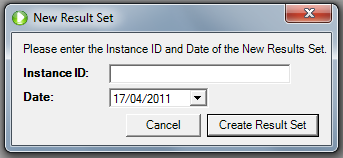
In the New Result Set dialog, enter the Result Set ID (at the top of the completed room form), and select the date you want to enter results for (also on the completed room form). Finally click the Create Result Set button to continue. N.B. if you are in Scan Mode you can scan the instance ID from the Room Form, and the result set date from the Date Sheet.
-
If the date you enter is more than 14 days (this can be set by an administrator) prior to the current date then you will need a Super User to override this and allow the Book In to continue.
-
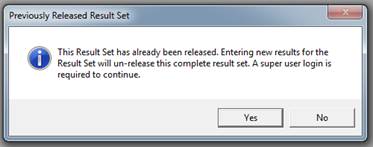
If a Result Set for this Date has already been entered and released, the system will automatically un-release the existing results. However you must use a Super User login to do this.
-
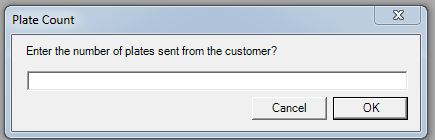
The system will ask you for the number of plate that have been sent by the customer. Enter the figure and click ok.
-
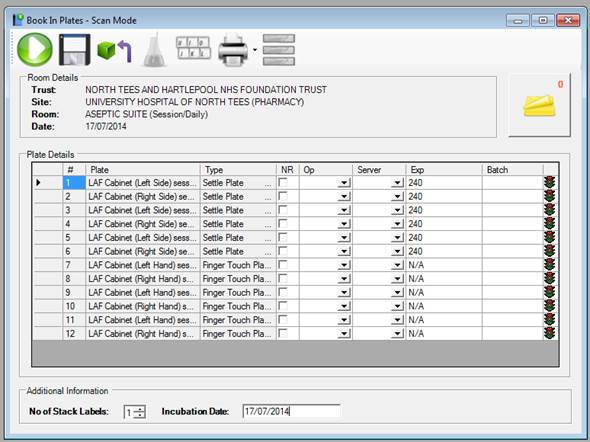
The new Result Set will display in the Room Details and Plate Details Frame. The Results Set plates will match with the plate you have on the completed room.
-
If the Room is a manufacturing room then you will also be asked to enter the product and batch number that relate to the results. The Manufacturing Product Information box will automatically display before you start entering results. From this box select the Product Code that has been made on that date and enter the Batch Number of the Product Code. Click the Update button to continue.

-
If at any point during Book In you need to change this information click the Product Information button to review this form.

-
Confirm that the Room Details at the top match up with the room details on your completed room form. If for any reason the site has sent more plates or plates which are from different instances then you can click the “Load Default Instance” button which will load the default instance plate list. You will then need to choose No Record on all the plates which have not been sent.

-
For each plate in the Plate Details table you must enter choose if the plate has not been exposed (No Record – the plate is not there), the operator, server and batch number for each plate. If you select No Record then you do not need to enter any more details for this plate. A green traffic light at the end of the line will confirm that you have entered the required details.

There are a number of shortcut you can use to fill in the form more quickly.
Description
Keyboard Shortcut
Copy record status, operator, server and batch number to all plates below the selected plate
Ctrl + F
Copy record status, operator, server and batch number to the next plate below the selected plate
Ctrl + D
-
At this stage you can also add any notes to the result set using the Notes Manager. Start by clicking the Notes Manager button.

-
Before Booking In the Plates you can select the date the plates went into incubation, and the number of stack labels required. If you have 20 plates which are stacked and stored in 10’s you would need 2 stack labels.

-
Finally click the Save button.

-
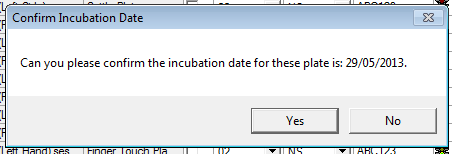
The Confirm Incubation Date dialog will ask you to confirm that the correct incubation date has been selected. Click OK to continue.
-
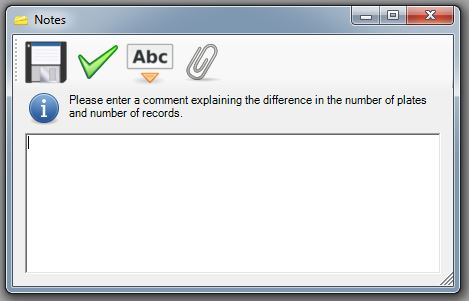
If there is a discrepancy and the number of results booked in, is different to the number of plates then the user must enter a reason for the difference. Click the Save button to continue. N.B. Normal note functions can be used.
-
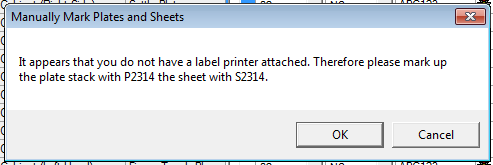
At this point labels will automatically be printed. One label must be attached to the Room Sheet, and the second attached to the Plate stack. This label contains the book in information and can be scanned when you are Entering Results. The plates then need to be incubated.
N.B. If you do not have a label printer attached to the machine, the Manually Mark Plates and Sheets dialog will explain how you should label your plates, and room sheet.