-
From the Enter
Results Form click the Enter Results button.

-
In the New Result
Set dialog, enter the Result Set ID (at the top of the completed room form),
and select the date you want to enter results for (also on the completed room
form). Finally click the Create Result Set button to continue.

-
If a Result Set
for this Date has already been entered and released, the system will
automatically un-release the existing results. However you must use a Super
User login to do this.

-
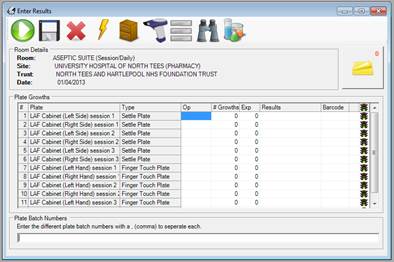
The new
Result Set will display in the Enter Results Frame. The Results Set plates
will match with the plate you have on the completed room form.
-
Confirm that the
Room Details at the top match up with the room details on your completed room
form.
-
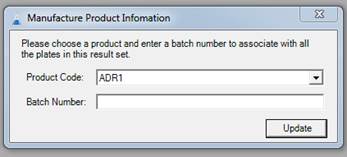
If the Room is a
manufacturing room then you will also be asked to enter the product and batch
number that relate to the results. The Manufacturing Product Information box
will automatically display before you start entering results. From this box
select the Product Code that has been made on that date and enter the Batch
Number of the Product Code. Click the Update button to continue. N.B.
If the results have been booked in and you need to change this you will
need to right click any of the fields and select Override BookIn. You will
also be forced to make a note of your change.
-
If at
any point during Book In you need to change this information click the Product
Information button to review this form.

-
To start
entering the results, double click anywhere on the plates list. The Enter
Results form will display. N.B. If room entry by Plate Number
is enabled, then a dialog box will ask you to enter the plate number you want
to enter the results for first, after closing each plate result you will be
asked for the next plate number you would like to read.
-
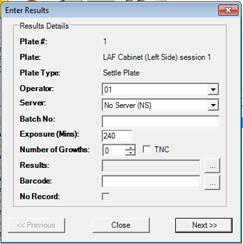
The first plate
in the list will be displayed in this form. You must then:
-
Select
an Operator from the drop down list.
-
Select
a Server from the drop down list (multiple operators must be enabled for
this to display.)
-
Enter
the Batch Number of the plate. (if this is a book in, there may be
multiple batch options to choose from.)
-
Enter
the Number of Growths counted on the plate, alternatively if there are too
many growths to count then tick the TNC option.
-
For
settle plates enter the exposure time.
-
If
there are more than 0 growths then you need to enter a description of the
growths.
-
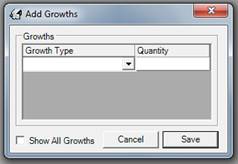
Click
the button with three dots on next to the results box. This will display the
Add Growths Form.
-
From the drop
down list select the growth type, and enter the quantity in the quantity
column. By default the growth type list only shows the default growth types.
To show all click the Show All Growths checkbox at the bottom of the
form.
-
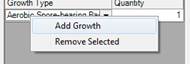
If you
need to enter multiple growth types, right click on the form and select Add
Growth from the drop down list. This will add a new row and allow you to
enter more growth details.
-
Once
the form is completed click the Save button. At this point the Results text
box will be updated with the growth details.

-
If the
growth needs further identification before you can enter the growth details
enter a unique id into the barcode box. This will allow you to enter the
growth details later using the quick results form. The system will generate
a unique ID for you automatically and print it onto a label by clicking the
button with 3 dots next to the barcode box. N.B. This is normally
used if you send results to a lab for ID.
-
If for
any reason the plate has not been exposed or there are no records matching
the plate then check the No Record checkbox. This can be used if you enter a
result set using a room’s default instance. You can then create a custom
room instance for a specific need.
-
If the
optional feature of auto-barcode out of spec results is turned on a barcode
will be automatically generated for the plate. The plate details will also
show in Red to highlight this.
N.B. If any of the labels turn red and the next / previous
buttons are disabled, this means that there has been an error and you cannot
continue before you fix it. The errors are normally either that required
information is missing, or that the growths counted and number of results do
not match.
- Click
the Next button to move onto the next plate, and then repeat step 6 until you
have entered all the plate results. By default the Operator, Server and
exposure time will stay the same for each plate until you change them.
-
Having
entered the entire result set click the close button at the bottom of the
Enter Results Screen. This will return you to an overview of the results in
the Enter Results form. If you need to modify any results, double click on the
list to modify.

-
At the
bottom of the Enter Results Screen the Batch Numbers of the plates will be
shown separated by a comma.

-
Using
the Notes button you can also add notes to the Result Set (See
Notes).
-
Finally
click the Save button on the top menu bar.

-
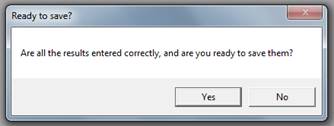
The
Ready to Save dialog will ask for confirmation that all the details have been
entered correctly. Click the Yes button to continue.
-
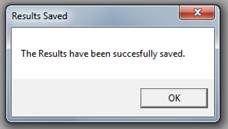
The
Results Saved dialog will confirm that the Result Sets have been successfully
saved. Click OK to continue.
-
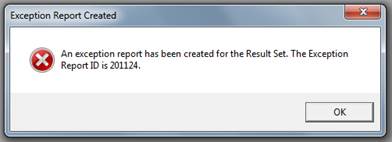
If an
exception report has been created the Exception Report Created dialog will
show to alert you to this, and give you the Exception Report ID. Click OK to
continue.